2 Understanding the Genesis Preferences
2.1 Interfaces
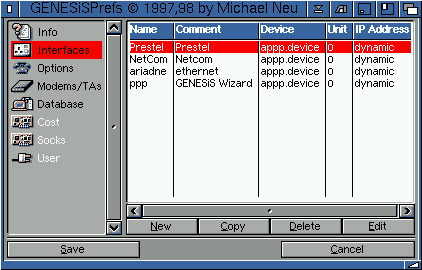
This screen allows you to create one or more interface to allow you to connect to the Internet or setup a local area network (LAN). You can also create multiple provider configurations for either testing or for different purposes. Say, for example, you wanted to connect to an alternative phone number, well you could do this by selecting another provider configuration, rather than editing the phone number in the preferences every time.

Simply click on the "New" button to create a new interface, the "Edit" button allows you to edit an old/existing interface and, of course, the "Delete" button deletes an old/existing interface.
Note: that when you have saved a configuration within the Genesis Wizard, this configuration will appear automatically within the Genesis Preferences GUI as shown above.You will notice that the configuration is called GenesisWizard Config. You can rename this by double-clicking on the config, or by pressing 'edit', and then entering a new name.
This automatic config should be fully usable, all you should need to do is to create a new user (or users) within the 'user' section, then press save.
Assuming you have clicked "New" or "Edit" you will see the following interface:
2.11 Interface
On this page you can choose the type of interface you want to create. Most people, ie those configuring Genesis to connect to their provider, will create a Point to Point Protocol (or PPP as it is generally known) interface.
However, if you are creating a LAN or PLIP (network via parallel port) network, you will want to choose an interface for this setup. For example, if you are using the ariadne ethernet board, you should select "ariadne" from the list of interfaces.
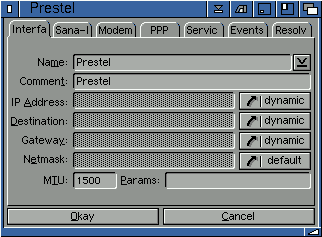
You'll see from the example image that a configuration, provided by the Genesis Wizard, has been edited. Simple choose a new name for this provider configuration.
If you have more than one Internet service provider, you can easily create another PPP interface and then rename this to "Demon", if you were using Demon Internet as the provider.
The IP address should looks something like "194.141.5.21".
If the destination is required (since it's a p2p iface) but none is given, Genesis will use the default gateway address as destination ip address too.
However, as stated, when using a PPP connection you should not need to enter a destination address as this will be obtained automatically by Genesis. Therefore most users will leave this set to 'dynamic'.
If no gateway address is entered and destination IP address is known (since one's using a Point2Point interface), this destination IP address will be used as gateway address.
Usually the manufacturer should tell the user which parameters he has to use and in most cases none are required!
2.12 Sana II
For most users this section will remain as "PPP", as PPP will be used for their network to their Internet provider.
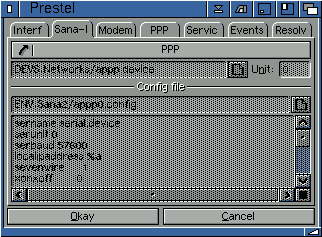
The PPP network uses the supplied appp.device as found in devs:networks.
However, if you are configuring another Sana II device, due to an ethernet connection or otherwise, you will need to specify the Sana II device manually. Enter the relevant unit number where applicable.
If you select a custom Sana II device, select this by using the requestor button below the "specify sana II device" cycle gadget. You will then have to create a config file for the Sana II device and enter the config information into the box provided.
2.13 Modem
This section allows you to choose the modem you require to connect to your internet service provider, enter their POP number (the phone number you dial to connect to your provider), your login and password and create a loginscript.
Note that you will have had to create a modem within the modem list (within the main Genesis preferences), before you can select a modem.

These multiple phone numbers must be seperated with a pipe "|". ie. "08451234567|08457654321".
When you first setup your account, you would have given your ISP a password you want to use or they will have assigned you a password. If you were given a password, it may look something like "wa1BcP5" or equally as strange looking.
Note: that you must enter your loginname and password correctly. ie. if your loginname is in lowercase, don't enter it in uppercase! Also, sometimes your password may be a mixture of uppper and lower case charaters.
If you enter an incorrect loginname or password Genesis will warn you that the info you entered was not correct and you will not be connected to your Internet Service Provider.
| Option | Function |
|---|---|
| Send | sends a function to your provider. ie. you might want to do a "send PPP". You would enter "PPP" in the box to the right of the cycle gadget. |
| Waitfor | waitfor a string (some text). ie. you might have to "waitfor HELLO", before doing a "GoOnline" |
| Dial | this function simply dials your provider |
| GoOnline | when you have dialed your provider and/or send the loginscript the last function is to "GoOnline" which will connect you to your provider |
| SendLogin | the function to send your loginname, when asked. Your provider may send "Loginname:" and you would do a "SendLogin" in return. |
| SendPassword | a function that sends your password to the provider, when asked. You provider may send a "Password:" and you would send a "SendPassword" in return. |
| SendBreak | some ISP's may require you to send a break (carriage return with no other function) to initiate a function. |
| Exec | !!fill info here!! |
| Pause | sends a pause command. Some ISP's, especially French ISP's, require a pause (in seconds) before you send the loginscript. Enter the number of seconds into the box to the right of the cycle gadget. |
| ParseIP | Usually, if you have to use a loginscript, the
provider will tell you your ip address in the login procedure. If
you're not using PPP which can negotionate the IP address
automatically (eg. slip), you could use "parse ip" to prefs this
information which would be lost otherwise. You'll have to enter some
text which appears right before the ip address during the login
procedure .. login example:
login: netconnect
password: xxxxxx
protocol> slip

Your IP address is 194.192.4.12
MTU is set to 1500
Then you could enter: "ParseIP Your IP address is" and Genesis will prefs the IP address. |
| ParsePasswd | Same as for ParseIP . The occassional provider may tell you your password for the next session during the login procedure. This could be used to prefs the password. |
If you use the Genesis Wizard, the Wizard will record the loginscript automatically. If you choose to enter the script manually into the Genesis Prefs, and your ISP suppors PAP and/or CHAP, enter this:
Dial [dials your provider]
GoOnline [jumps into GoOnline mode and configures your connection to your ISP]
If your ISP requires you to login with a loginscript, something like this may be required:
Dial [dials provider]
WaitFor "login:" [waits for your provider to send a login: command]
SendLogin [sends your loginname, as requested]
WaitFor "password:" [waits for your provider to send the password: command]
SendPasswd [sends the password, as requested, to your ISP]
WaitFor "HELLO" [waits for the HELLO command]
GoOnline [loginscript completely, go online and configure the connection]
2.14 PPP
This section is solely for a dialup connection to your Internet Service Provider, and would not be needed for a local area network, or other network.
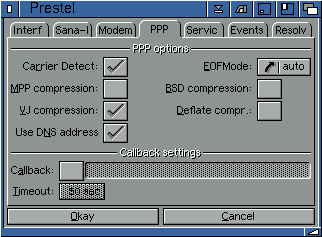
Together with a low MTU value this will make interactive links (telnet and the like) feel less slugish.
VJ compression should always be enabled.
MPP, Deflate and BSD compression notes: These compression methods only make sense in environments where the physical connection to the remote computer does not provide compression (eg. uncompressed ISDN connections, connections thru a null-modem cable). In all other cases the usage of these compression methods is a complete wast of memory and cpu cycles. Therefore a modem user should probably not use MPP/BSD/Deflate compression.MPP/Deflate/BSD compression modules compress the whole packets transmited. Those are CCP (compression control protocol) modules, CCP has nothing to do with VJ compression.
Only one CCP module can be active at any time (for one direction of the link), but it is perfectly legal to (first) do VJ compression and then, for example, MPP compression. VJ compression is desirable even if one of the CCP modules is active. CCP modules are general data compression routines, whereas VJC was specificaly designed to compress TCP/IP headers. Because of this VJC will compress TCP/IP headers better than any CCP module.
If you have enabled one or more of the above compression methods (and they are in use) and you notice that the connection thoughput is slower, this means that the cpu is overloaded (or that your cpu is too slow, depending on your point of view). If you cannot free cpu resources you will have to disable compression in this case.
What will happen is that when you dial your provider, they will notice the callback string and terminate the connection. PPP will now wait for the ISP to call back, answer the phone and establish a connection.
Callback note: If you use software such as "STFax Professional" to answer incoming calls (with or without the shared device option) on your callback line, STFax will probably answer the call as well as your PPP device. Therefore it is a good idea to use an alternative line for callback or to disable "auto answer" within your voice software.
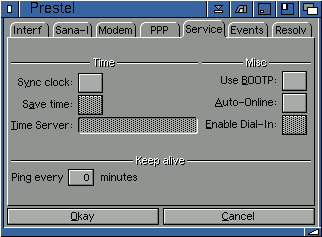
2.15 Services
These are specific to your Internet Service Provider, not local area network.
2.16 Events
This section allows you to configure scripts to execute when certain 'events' occur, relating to PPP. For instance you could have a script that played a sound or executed (started) a program when PPP has been put offline.
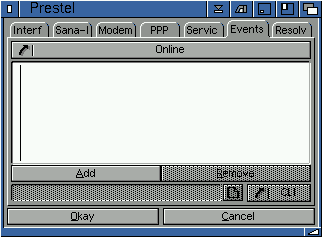
An example would be an arexx script to put call waiting (on your phone network) off and then back on when PPP is on or offline. You do not want to disable call waiting when you are running a local area network (ie. if you ran a script to turn call waiting off, when you started Genesis - via the events control - Genesis will not put call waiting back on again, until you disconnect you entire network!), only when putting your modem off/online.
You can also run a script or execute a program when online has failed.
2.17 Resolv
Here is where you enter information such as the host name, domain name and whether you want Genesis to query these domains every single time you connect to your provider.
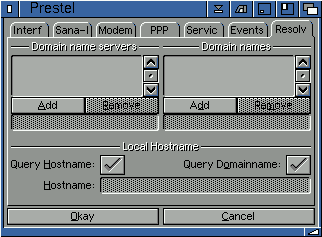
Quite often you can leave everything set to "Dynamic" and not tick "Don't query host and domain name", and Genesis should, at least in theory, collect all the information it requires.
However, there are some providers than do not support the function to obtain a domain and hostname via querying their network. These are generally smaller providers, without the "advanced" technology needed to do this. However nearly ever UK and US provider will be able to support this, from our experience.
There are two reasons why you would want to enter your host and domain names into this interface:
However, if you enter this information manually, not only will you get the right information every time but you will also be entering the best possible information resulting in the best possible connection.
If you are a beginner, you are best using the Genesis Wizard to connect to your provider or or leave the domain and host name boxes ticked.
Most providers will supply two domain name servers (often called DNS address 1 and DNS address 2), although the occassional provider has more than two.
Enter the DNS addresses into the box in the way they are provided by your provider.
If you were connected to Enterprise PLC (UK) and your email address looked like "example@enterprise.net" you would enterprise "enterprise.net" as the domain name.
Nearly all providers only have one domain name, so more often than not, you would enter only one name.
Go to the previous, next, chapter, table of contents.